Configuring Audio for Best Sound
Changing a few settings in Zoom will pay big dividends in improved sound quality. And it is not hard to do. If you are not very technical, and these instructions sound dense, don't be discouraged. The look of the screens may vary between devices and versions of the Zoom application. But, the same principles apply, so you should be able to figure things out.
Begin by joining your meeting or join the Zoom Test Meeting. Just enter this URL in your browser's address bar: https://zoom.us/test . Or, if you are already on the Zoom web site you can click the "Test Zoom" link on the page footer.
On Personal Computers (PC or Mac)
These examples were taken from a Windows 11 computer with Zoom Workplace version 6.1.12.
First you must set up your initial audio settings. These apply in any session you join.
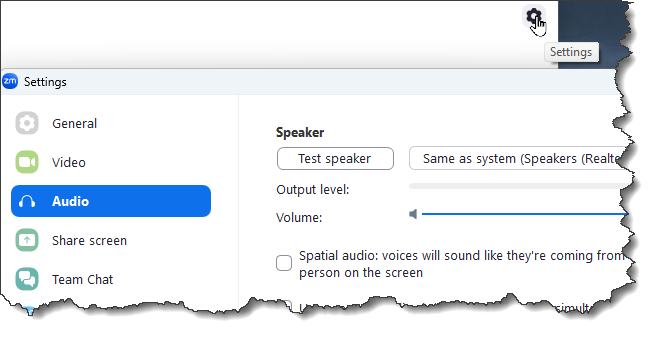
You can use the Zoom Workplace application to change settings before you join a session. Click the gear icon and select "Audio" on the settings screen.
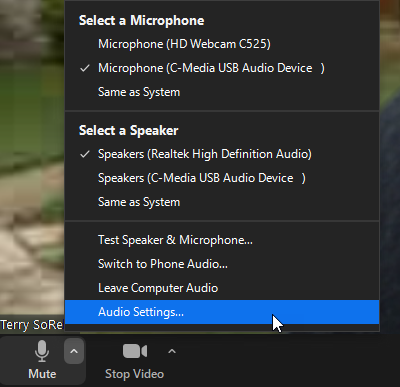
Or, during a session, you can click the caret next to the microphone icon. and select "Audio Settings"
Microphone Settings
On the first audio settings screen find the "Microphone" section.

Be sure that the microphone you wish to use for your sessions is selected. Turn off the option “Automatically adjust volume” and adjust the mic volume to your liking. It usually works best at %75 to %100 volume. Click “Test Mic” to see how it sounds.
Audio Profile: Original Sound
Look for the "Audio Profile" section. Usually just below the Microphone section.
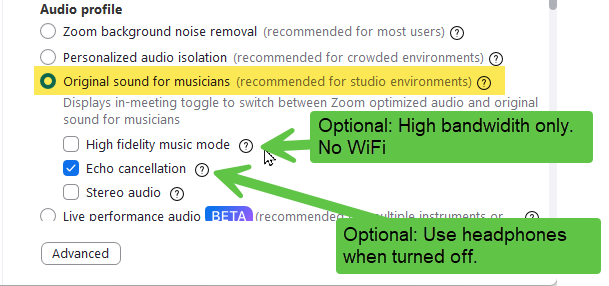
Select "Original sound for musicians". The three checkbox options below are settings that apply when original sound is on.
- High fidelity music mode may improve sound quality. You must, however, have a high-bandwith connection by ethernet cable. Do not use over WiFi. It also exacts significant hardware demands.
- Echo cancellation: It may improve sound quality to turn off 'Echo cancellation'. If you do that you must use headphones to avoid an unwanted echoing effect. Note that it is the listening participants that will experience the echo, you won't hear it yourself.
- Stereo audio requires stereo microphones or mixing equipment on the recording side and stereo speaker playback on the listening side for full effect. This hardly ever applies to our song sessions.
Advanced Settings
Click the "Advanced" button at the bottom of the page (you may need to scroll down to see it). This brings up one or two more settings.
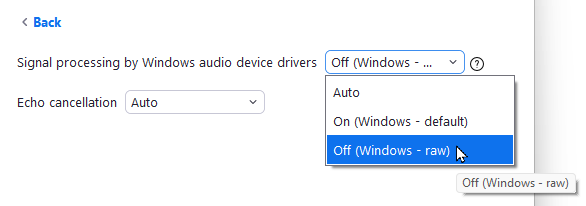
On Windows machines, the setting "Signal processing by Windows audio device drivers" may appear. Setting this to 'Off' may help with microphone issues on some devices.
Echo cancellation should be set to 'Auto' not 'Agressive'.
You may now close the settings screen.
During a Session: Turn Original Sound on
Once the original sound setting is activated and you have joined or returned to a meeting you will see an "Original sound for musicians" button, usually located in the upper right corner.
If it is labeled "off" click to turn original sound on.

When the button is labeled "Original sound for musicians: on", you may click to turn it off again

At the time of this writing, original sound is always turned off at the beginning of the session. You must remember to activate it again before you perform.
On Mobile Devices (iOS or Android)
These examples were taken from an iPhone 15-Max running Zoom Workplace version 6.2.5.
For mobile devices, you'll need to set up your Zoom account. A basic account is free but has some limitations on any meetings you host yourself.
If you haven't already done so, install the Zoom mobile app from your app store. Before you begin, you can create an acount using the app or on https://zoom.us/signup
You need to enable the "Original Sound" option. Join a meeting or start the Zoom app and log in with your new account credentials.
Tap the settings icon.
Select "Audio" settings.
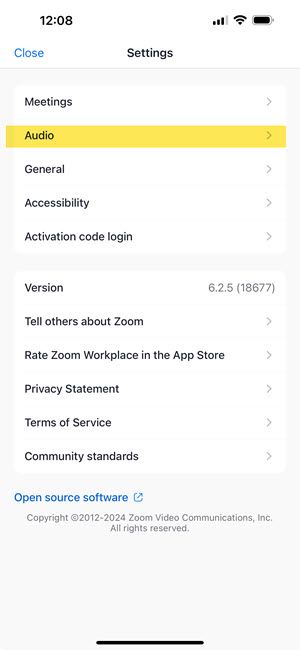
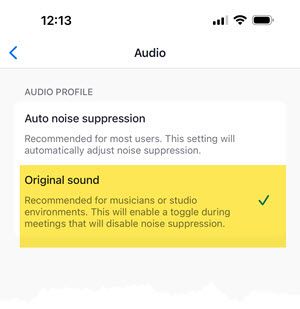
Tap Original Sound. "Auto noise suppression" should be off (no check mark)
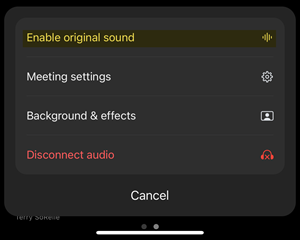
When you have joined your meeting. Then you can...
Tap More.

Tap Enable Original Sound.
An Advanced Technique for Windows
This technique has been suggested for more thorough control over recording settings. I confess that I have not tried it but it might be helpful in some situations. Proceed with caution and test well before you join a song session.
The idea is to override Zoom's control over the audio input, for a particular microphone. You would then use the "Microphone Properties" screen in Windows settings to set the mic volume and any other setting that your Windows configuration offers.
.
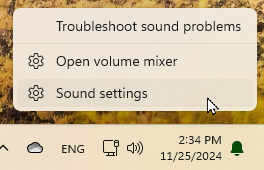
First you need to find the "Sound Settings" screen. A quick way is to right-click the speaker icon on the Windows tool bar and select 'Sound Settings'.
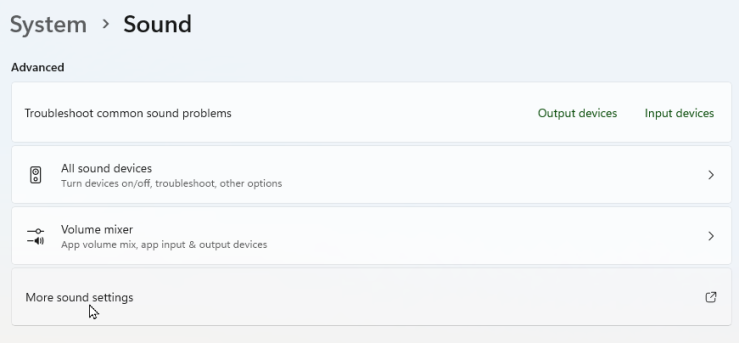
Scroll to the 'Advanced' section and select "More sound settings".
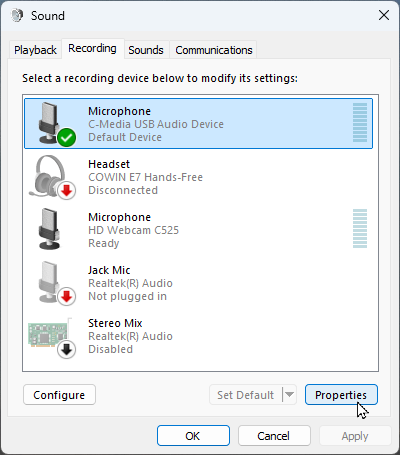
On the "Sound" dialog:
- select the "Recording" tab
- select your microphone
- and click the "Properties" button.
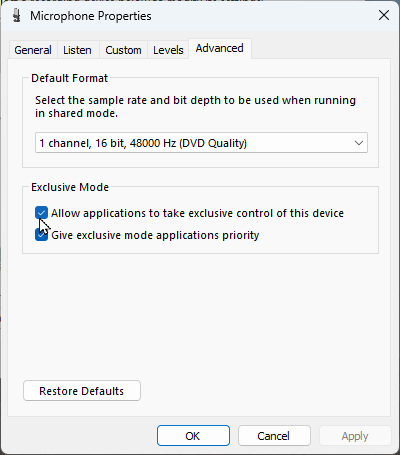
In 'Microphone Properties',
- Select the 'Advanced' tab
- Under 'Exclusive Mode", un-check 'Allow applications to take exclusive control of this device.'
- Then click the 'Apply' or 'Ok' button.
Note the "Restore Defaults" button. If this doesn't work out you can return here and put things back in order. You may also want to experiment with the "Default Format" and see if changing that setting results in any improvements.
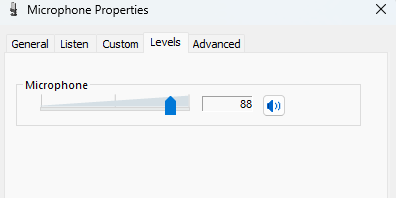
Since Zoom now has no control over your mic you'll need to control the mic volume on the "Levels" tab of the "Microphone Properties" page.
The driver for you microphone may have more features than are pictured here. Good luck!
These instructions were developed using a Windows 11 computer.
